When a Vet Must Perform Surgery Through a Turtle Shell
6351 Views |

When a Vet Must Perform Surgery Through a Turtle Shell
By Dr. Akkaraphat Butsurin (Dr. Tong)
Fishing has been a popular activity in Thailand for generations, spanning streams, ponds, canals, natural reservoirs, and the vast ocean. Usually, the creatures taking the bait are various types of fish. However, today’s "unlucky one" for the doctor turned out to be a Southeast Asian Box Turtle (Cuora amboinensis), affectionately named "Hub." That’s Bad Luck Strike One.
A kind-hearted rescuer brought Hub to the Khwan Kham Animal Hospital, reporting that the fishing line had snapped. I would like to offer a word of advice here: if you find a turtle that has swallowed a fishhook, never pull or yank the line to remove it yourself. Doing so only causes the hook to embed deeper and damages the turtle’s digestive tissues, which significantly lowers the chances of a successful recovery. That’s Bad Luck Strike Two.
Diagnosis and Challenges
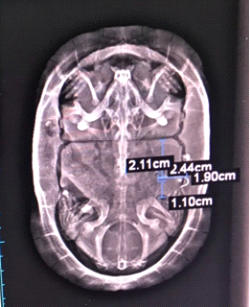
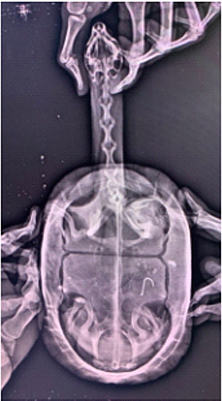
Upon physical examination and X-rays, a fishhook was indeed found on the left side of the body (as seen in Figure 1). To be absolutely certain the hook wasn't just stuck in the esophagus—since turtles can retract their necks into their shells—I decided to sedate Hub and extend his neck for a follow-up X-ray.
The results confirmed that the hook was deep within the stomach (Figure 2). This was particularly unfortunate because, in most cases, swallowed hooks get stuck in the esophagus, which is much easier to treat and doesn't require opening the shell. That’s Bad Luck Strike Three. T^T
The Wild Animal Rescue Volunteer Project (V WAR Thailand) at Khwan Kham Animal Hospital officially took Hub into their care.
Figure 1: X-ray showing the fishhook on the left side, not in the esophagus.
Figure 2: X-ray with the neck extended, confirming the hook's position in the stomach.
The Surgical Procedure
With the exact location of the hook identified, I decided to proceed with a plastronotomy (opening the shell from the bottom) to remove it. This was the only remaining option to save his life.
Anesthesia: We began with injectable sedatives and anesthetics to induce sleep, followed by gas anesthesia to maintain a stable, pain-free state throughout the surgery. We also administered analgesics for pain management and antibiotics to prevent infection.
Preparation: The bottom shell (plastron) was thoroughly scrubbed with antiseptic solution to ensure a sterile surgical site.
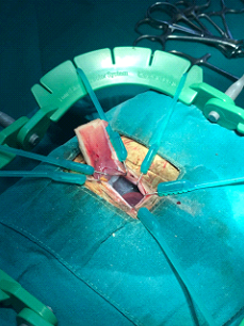
Opening the Shell: Using specialized tools, we created a "window" in the shell. The key is to cut at a 45-degree angle on three sides. This creates a beveled edge so that when the piece is put back, it fits perfectly and doesn't collapse into the abdominal cavity (Figure 3). We leave one side attached to the body to preserve the underlying tissue and blood supply, which significantly aids the healing process (Figure 4).
Figure 3: Using specialized equipment to cut the shell.
Figure 4: The rectangular "window" opening, beveled at an angle.
Retrieving the Hook: We used specialized hooks to gently retract the internal organs and bring the stomach into view while minimizing tissue damage.
Gastrotomy: Once the stomach was identified, we secured it with stay sutures and carefully opened it. There it was—the problematic fishhook (Figures 5 & 6).
Figure 5: Opening the stomach.
Figure 6: The problematic fishhook removed from the turtle.
Closing Up: We sutured the stomach and the muscle layers beneath the shell. Finally, the shell piece was sealed back in place using Epoxy-Resin to prevent any external contamination or infection.
Post-Operative Care
The surgery is only half the battle. The heart of a successful recovery lies in supportive treatment. Hub requires ongoing pain management, nutritional support, and a strict antibiotic regimen to ensure he recovers fully.
Let’s all send our support to Hub, hoping he heals quickly so he can return to swimming in the wild once again!


 Light and Reptile Husbandry")

